LogoLogo
Help
  • Overview
    • Introduction
    • Characteristics
    • Platforms
  • INITIAL Installation
    • 1. Instructions by platform
      • ProSBC Requirements Matrix
      • Baremetal Installation
        • List of Supported Network Interface Cards
        • SBC Certified Hardware
          • High Performance Baremetal Server
          • Medium Performance Baremetal Server
          • Ciena 3906mvi server for Customer Premises Equipment (CPE)
          • Qotom Barebone server for Customer Premises Equipment (CPE)
          • Lanner Barebone server for Customer Premises Equipment (CPE)
          • Telco Systems virtualization platform on Lanner NCA-2510 server for Customer Premises Equipment(CPE)
      • Virtual, self-hosted Installation
        • Virtual - Proxmox
        • Virtual - VMware
          • Launching an Instance of VMware vSphere
          • Deploying ProSBC on VMware
          • Adding Network Interfaces in VMware
          • Configuring Passtrough interfaces on VMware
      • Cloud Installation
        • Cloud - AWS
          • AWS Installation
          • Cloud Formation Installation
          • Instance Upgrade
          • AWS Additional Interface
          • AWS Installation Troubleshooting
          • Recovering an Elastic IP address
        • Cloud - Azure
    • 2. Initial Configuration
      • Initial Setup
        • SBC Management IP configuration
      • Basic configuration
        • Configuring IP interfaces
        • Creating a SIP stack
        • Creating a SIP transport server
        • Allocating an SIP NAP
        • Allocating a SIP open NAP
        • SIP Transport DNS settings
        • Creating a first call route
    • 3. Uploading a License
      • Host-control
        • SELinux
        • SELinux management
      • Add/Change Licenses
        • Add/Change Licenses Manually
  • Use Cases
    • Applications
      • Carrier Interconnection
      • Monitoring as a Service (MaaS)
      • NGN Interconnection
      • Operator Interconnection
      • SIP subscribe notify publish forwarding
      • STIR/SHAKEN
      • Transcoding
      • SIP Trunking
      • Hosted PBX
      • SIP Network Peering
      • Remote Workers
    • Interoperability Examples
      • STIR/SHAKEN with Transnexus and ClearIP
      • Fraud Detection [YouMail]
      • Skype Connect
      • Skype for Business S4B TCP
      • Skype for Business S4B TLS
      • Asterisk
      • 3CX
      • FreePBX
      • FusionPBX
      • FreeSWITCH
      • Twilio
      • Sippy
      • Avaya IP Office
      • Cisco UCM 12
      • Brekeke PBX
      • VitalPBX
      • Yeastar P-Series Cloud
      • VoIP.ms
      • Wildix
  • CONFIGURATION DETAILS
    • Configuration By Web Portal Category
      • System Settings
        • Setting the Role to Standalone
        • Setting the Role to a Primary Unit in a 1+1 System
        • Setting the Role to a Secondary Unit in a 1+1 System
        • Resetting the Host Role
        • Resetting the Network Device Role
        • Create Session Border Gateway Access Control List (ACL)
        • Session Border Gateway: Advanced Parameter Settngs
        • Create Session Border Gateway Access Control List (ACL) Filters
        • Connecting to the Web Server and Logging on to the Web Portal
        • Logging Off
        • Modifying Security Settings
        • Creating Web User groups
        • Creating Web Users
        • Modifying Web User Permissions
        • Enabling and Disabling a User
        • Deleting a User
        • Accessing Audit Logs
        • Activating the Configuration
        • Configuring a Web Portal Profile
        • Configuring the Date, Time, Timezone and NTP servers
        • Configuring the DNS
        • Create HTTP Service
        • Use HTTPS service
        • Configure HTTPS certificates
        • Configuring letsencrypt certificate
        • Configuring the ICMP
        • Configuring the SSH
        • Upgrade Telcobridges linux software packages
        • Retrieving a Software Release
        • Uploading a Software Release
        • Activating a Software Release
        • Retrieving a License
        • Uploading a License
        • Database Backup
        • Downloading a Database Backup
        • Uploading a Database Backup
        • Restoring a Database
        • Enabling the SNMP Agent
        • Configuring the SNMP Agent
        • Creating an SNMPv1/SNMPv2 Community
        • Creating an SNMPv3 User
        • Creating an SNMP Trap Destination
      • IP Network Settings
        • Configuring a Virtual Port
        • Configuring a VLAN
        • Configuring an IP Port Range
        • Configuring IP Interfaces
        • Configuring NAT Traversal
          • Local NAT Traversal
          • Remote NAT Traversal
        • DNS Configuration
          • Creating a DNS Local Entry
        • Configuring VoIP Interfaces
      • SIP
        • Creating a SIP Stack
        • Creating a SIP Transport Server
        • TLS/SRTP
          • Creating TLS Certificates
          • Adding TLS Certificates
          • Configuring TLS Profiles
        • Enabling SIP-I/SIP-T
        • SIPREC Forwarding
      • SIP Registrar
        • Creating a SIP Domain
        • Creating a SIP Registrar
        • Creating a SIP Register Filtering Rule
        • Creating a SIP Register Filtering Rule Condition
        • Creating a SIP Register Filtering Rule Action
      • Network Access Points (NAP)
        • Allocating a SIP Open Network Access Point (NAP)
        • SIP NAP Polling
      • NAP Profiles
        • Profile SDP Description
        • Fax Settings
          • Configuring Fax Relay
          • Configure Fax Passthrough
          • Configure Fax T38
          • Configure Fax NSE
          • Configure Fax VBD
      • Call Routing
        • Creating a First Call Route
        • Enable Flexible NOA Routing Script
        • Add NOA Columns in Routes
        • Import Customized Routing Script
        • Add Customer Column in Routes
        • Add Customized Filter Script To Main Script
        • Adding Label Routing to a Routing Script
        • Assign Routing Script Database Files to the Gateway Application
        • Add Digitmap Files to the System
        • Add Routeset Definition Files to the System
        • Assign Definition Digitmap Files on a per NAP Basis
        • Generate Dynamic Routes
        • Steps to configure label routing for Group of DIDs to a single outbound NAPs
        • Steps to configure label routing for Group of DIDs to multiple outbound NAPs
        • Group of DIDs to multiple outbound NAPs: Load-sharing mode
        • Group of DIDs to multiple outbound NAPs: Priority Mode
        • Update the Digitmap Files
        • Update the Routeset Definition Files
        • Configuring RADIUS Authorization
        • Importing a RADIUS Custom Dictionary
      • Lawful Intercept
        • Lawful Intercept Status
        • Verifying lawful interception
        • Importing a Lawful Interception .CSV File
        • Enabling Lawful Interception in a Routing Script
        • Configuring Lawful Interception
      • Call Detail Records (CDR)
        • CDR Variables
          • Call statistics format
        • Retrieve Text CDRs
          • Automatic CDR Retrieval
        • RADIUS CDRs
          • Configuring RADIUS
          • Adding RADIUS Server(s)
          • RADIUS CDR attributes
      • Routing Scripts
        • Development Guides & Tutorials
          • Accessing Routing Script Parameters
          • Parameter Mapping
          • Script Parameters Definition
          • Script Parameters Definition for SIP
          • Accessing Information about Registered Users
          • Route Parameters and Call Routing
          • Playing prompts, announcements, and tones
          • Recording
          • User-to-User Information
          • Radius Authorization
          • ENUM Query
          • DNS Query
          • Call Diversion Options
          • Call Transfer Requests
          • Redirection
          • Connect Number
          • Terminating Calls
          • NAP Status and other NAP Information
          • Telephony Services (CNAM Requests over SS7)
          • Custom User Context
          • Routing Script Tests
          • Create New Routing Script
          • Enable Routing Script
    • Configuration By Use Case
      • SIP Trunking Configuration
        • Configuration Files for SIP Trunking Scenario
        • SIP Trunk Configuration Instruction with 3CX
        • SIP Trunk Configuration Instruction with FreePBX
        • SIP Trunk Configuration Instruction with FusionPBX
        • SIP Trunk Configuration Instruction with FreeSWITCH
        • SIP Trunk Configuration Instruction with Twilio Elastic trunking
        • SIP Trunk Configuration Instruction with Avaya IP Office
        • SIP Trunk Configuration Instruction with Brekeke PBX
        • SIP Trunk Configuration Instruction with Avaya IP Office
        • SIP Trunk Configuration Instruction with Yeastar P-Series Cloud
        • SIP Trunk Configuration Instruction with Cisco UCM
        • SIP Trunk Configuration Instruction with VoIP.ms SIP trunking
        • SIP Trunk Configuration Instruction with Wildix Cloud VoIP PBX
        • Configuration for Adding ProSBC as a SIP Trunk in the FreePBX Server
        • FreePBX Extension Creation
        • FusionPBX SIP Trunk Creation
        • FusionPBX Extension Creation
        • FreeSWITCH SIP Trunk Creation
        • Twilio Elastic SIP Trunking Configuration
        • Sippy SIP Trunk Creation
        • Avaya IP Office Trunk Creation
        • Cisco UCM 12 Trunk Creation
        • Adding ProSBC as a SIP Trunk in the Brekeke PBX
        • VitalPBX Extension Creation
        • Adding ProSBC as a SIP Trunk in the Yeastar P-Series Cloud
        • Adding ProSBC as a SIP Trunk in the Wildix Cloud VoIP PBX
        • SIP Trunk Configuration Instruction with VitalPBX
        • VitalPBX SIP Trunk Creation
      • Configuring SIP Registration to SIP Proxy
      • Configuring a Hosted PBX
      • Multiple Domains/Hosted PBXs
      • SIP Network Peering / IP Carrier Interconnection
      • Remote Workers
        • Configuration Files for Remote Office/Workers
        • Remote Workers Configuration Instruction with FusionPBX
        • Remote Workers Configuration Instruction with 3CX
        • Remote Workers Configuration Instruction with FreePBX
        • Remote Workers Configuration Instruction with VitalPBX
      • ProSBC and ClearIP (TransNexus)
        • Configuration for STIR/SHAKEN with Transnexus' ClearIP service
        • Configuration for CNAM Verification and Robocall Analytics with Transnexus' ClearIP service
        • Configuration for Robocall Mitigation with Transnexus' ClearIP service
        • Configuration for 302 Redirect routing with Transnexus' ClearIP service
        • Configuration for CAPTCHA Authentication – 302 Redirect with Transnexus' ClearIP service
        • Configuration for STIR/SHAKEN with Transnexus' ClearIP service
      • Transcoding Unit Configuration
        • Baremetal and Virtual Machine
        • Show the Hardware Units menu
        • Adding Transcoding Unit
      • Configuration for Adding YouMail Script to Routing Scripts
      • Skype Connect Example Configuration
      • Skype for Business Example Configuration
      • 3CX Phone Provisioning Configuration
        • Configuration for 3CX PBX Server with the ProSBC to receive T38 Faxes
        • Configuration for 3CX PBX Server with the ProSBC as SIP trunk
      • SIP Emergency
      • SIP registration forwarding
        • Creating a SIP Domain
        • Configuring SIP Registration for Open NAP
        • Configuring SIP Registration for regular NAP
      • RTP no-anchoring
        • Parameter: Allow low-delay media relay
          • Configuring an IP Port Range
        • Creating Profiles
          • Modifying SDP Profile Settings
          • Modifying SIP Profile Settings
          • Modifying RTP and Audio Settings
          • Modifying FAX Relay Profile Settings
          • Modifying Telephony Profile Settings
          • Modifying Tones and Call Progress Options
          • Modifying IVR Record Profile Settings
          • Modifying LNP Profile Settings
          • Modifying Multilevel Precedence and Preemption (MLPP) Options
          • Modifying Call Transfer Profile Settings
          • Modifying Tone Definition Profile Settings
    • Configuration Parameters (all)
    • Routing Script - SIP 302 Handling
  • Maintenance & Troubleshooting
    • Maintenance Guide
      • Check Disk Space
      • ProSBC Processor Usage
      • Troubleshooting Toolpack
      • Restoring a Database
    • System Upgrades
      • Migrate current database
      • Upgrade Telcobridges linux software packages
    • Software version release notes
    • Software version release download
    • ProSBC public roadmap
  • Troubleshooting & Support
    • Troubleshooting Tips & Actions
      • Configuring Call Trace
        • Retrieving Call Trace
        • Call Trace Filter Parameters
      • Creating a test call
      • tbsigtrace: Signaling trace capture tool
        • Accessing Device
          • TMG:Change Management IP Address
          • Password less ssh
          • How to setup ssh tunnel with PuTTY
        • Live Signaling Capture with tbsigtrace
      • How to Get Rid of Sub Optimal Warning
      • How to Lower The Trace Level on an Application
      • TBReport
      • VoIP Ethernet Capture on a ProSBC
      • Enabling Call Recording
      • Accessing the Call Recording
      • Routing Scripts
        • Update Your Routing Scripts
        • Disabling a Call Route
    • Troubleshooting Common Problems
    • Support Links
      • Support Forums
      • ProSBC Training
      • Customer Dashboard User Guide
      • Contacting TelcoBridges technical support
      • Frequently Asked Questions
      • Sending Large Files to TelcoBridges
    • How to use tbx cli tools remote program
  • Tools, Tips, and Tricks
    • TelcoBridges Magic Bookmark
    • Video Library
    • RESTful API
      • Postman Examples
      • Ruby Examples
      • TBConfig Examples
        • Exporting a Configuration
        • Importing a Configuration
        • Activating a Configuration
        • Updating a Route
        • Dropping Calls
      • ProSBC:Restful API SIP Domain
      • ProSBC:Restful API SIP Domain Registrar
      • Extracting Call Traces with the API
    • TBStatus API
      • Tbstatus monitoring
      • Status API
      • Dropping calls
  • Appendices
    • Appendix A: Glossary
      • Glossary: Call Detail Records (CDR)
      • Glossary: Call routing
      • Glossary: DNS
      • Glossary: Mean Opinion Score (MOS)
      • Glossary: NAP
      • Glossary: RADIUS
      • Glossary: Ringback tones
      • Glossary: SAP
      • Glossary: Signaling protocols
      • Glossary: SIP
        • Glossary: Route retry
        • Glossary: SIGTRAN
        • Glossary: SIP-I/SIP-T
        • Glossary: SIP gateway
        • Glossary: SIP Registration
      • Glossary: Softswitch
      • Glossary: Toolpack
        • Glossary: Web server
        • Glossary: tboamapp
          • Glossary: Tbtoolpack Service
            • System Id
              • Gateway Port
          • Primary/Secondary
          • Master/Slave
            • Active/Standby
      • Glossary: Unified communications
      • Glossary: Web Portal
      • Glossary: DTMF Relay
    • Appendix B: Product Datasheets
Powered by GitBook
On this page
  • Introduction
  • Typical Call-Flow Scenario
  • CNAM Lookup Call Flow
  • ProSBC Configuration
  • Initial Common Procedures
  • Scenario 1:One ClearIP NAP
  • Scenario 2: More than one ClearIP NAP
  • Final Common Procedures

Was this helpful?

  1. CONFIGURATION DETAILS
  2. Configuration By Use Case
  3. ProSBC and ClearIP (TransNexus)

Configuration for CNAM Verification and Robocall Analytics with Transnexus' ClearIP service

PreviousConfiguration for STIR/SHAKEN with Transnexus' ClearIP serviceNextConfiguration for Robocall Mitigation with Transnexus' ClearIP service

Last updated 4 months ago

Was this helpful?

Introduction

This document provides instructions to configure a ProSBC to operate with the TransNexus/ClearIP server for verification with CNAM and Robocall Analytics. TransNexus/ClearIP is a SIP redirect server that provides advanced Least Cost Routing (LCR), fraud control and STIR (Secure Telephony Identity Revisited) / SHAKEN (Secure Handling of Asserted information using toKENs) features.

ProSBC 3.0.90 or a later version is needed to support verification with CNAM and Robocall Analytics with TransNexus.

  • For other configurations with all Transnexus/ClearIP Solutions, please refer .

Typical Call-Flow Scenario

In this call flow scenario the network diagram illustrates the typical layout of the network. This is followed by a detailed description of the call flow.

CNAM Lookup Call Flow

1. The ProSBC receives an inbound call from the Service Provider.

2. ProSBC forwards the call to ClearIP for verification with CNAM and Robocall Analytics

3. ClearIP performs a verification, CNAM lookup, Robocall Analytics, and then sends one of the following responses to ProSBC

  • SIP 404 Not Found: No fraud is detected. This is not a robocall.

  • SIP 503 Service unavailable: No fraud is detected. This is not a robocall.

  • SIP 603 Decline: Fraud is detected. Block the call.

  • SIP 302 with CNAM in PAI header or X-Identity header

Upon receiving 404 or 503

    ProSBC returns SIP 503 (or mapping to the TDM cause code) to the Source switch to perform route advance  
    Call Source (TDM or SIP) --------Invite or SETUP or IAM ---------> ProSBC/TMG ----Invite--> ClearIP
    Call Source (TDM or SIP) <---SIP 503 or REL with 41 or 34 -------- ProSBC/TMG < ----503---- ClearIP
    ProSBC route advances on SIP 503 and sends call to next destination, does not return response to the Source switch  
    Call Source (TDM or SIP) ---Invite or SETUP or IAM ---> ProSBC/TMG ----Invite--> ClearIP
                                                            ProSBC/TMG < ----503---- ClearIP
                                                            ProSBC/TMG  ----Invite---Next Routes

Upon receiving 603

    ProSBC returns SIP 603 (or mapping to the TDM cause code) to the Source switch, then release the call 
    Call Source (TDM or SIP) -----Invite or SETUP or IAM ------> ProSBC/TMG ----Invite--> ClearIP
    Call Source (TDM or SIP) <---SIP 603 or REL with 21 -------- ProSBC/TMG < ----603---- ClearIP

Upon receiving 302

    ProSBC extracts the CNAM in PAI header or X-Identity header of the 302, and pass it to the next destination (NAP) according to the Routes priority order
    Call Source (TDM or SIP) ---Invite or SETUP or IAM ---> ProSBC/TMG ----Invite--> ClearIP
                                                           ProSBC/TMG < ----302---- ClearIP
                                                           ProSBC/TMG  ----Invite with CNAM in PAI or X-Identity header --->Next Routes

ProSBC Configuration

This section provides the ProSBC configuration procedures for the solution. They are grouped into 4 main sections.

  • Initial Common Procedures: The procedures in this section are common to any scenario. You must follow them.

  • Scenario 1, One ClearIP NAP: Follow this section to learn how to configure ProSBC with one ClearIP NAP without a need to differentiate between Inbound and Outbound calls.

  • Scenario 2, More than one ClearIP NAP: Follow this section to learn how to configure ProSBC in which you have more than one ClearIP NAP and you need to differentiate between Inbound and Outbound calls.

  • Final Common Procedures: The procedures in this section are common to all scenarios.

Initial Common Procedures

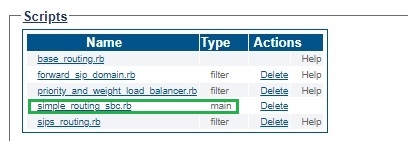
Configure Routing Script

ProSBC is configured to use routing scripts to send some SIP headers to ClearIP to identify the source of the call.

1. Enable routing script

Gateway->Use script: choose the right main script

2. Load routing scripts

  • Import the filter script:

Gateway->Routes->Routing Script->Import Script File
   File->ClearIP_Query.rb
   ScriptType->filter
   Load on startup->checked
  • Include the filter script in the main script, default is simple_routing_sbc.rb.

Note: Only one "main" script should show the set of the Scripts:

Gateway->Routes->Routing Script->Edit the main script:

- Add the "require 'ClearIP_Query' unless defined?(ClearIPQuery)" statement at the top of the main script.
- Add the "include ClearIPQuery" statement in the main routing class.
- Add the filter "  before_filter :method => :ClearIP_query" in the main routing class.
  • Note: if label routing or other before_filter script are used, please place ClearIP_query last

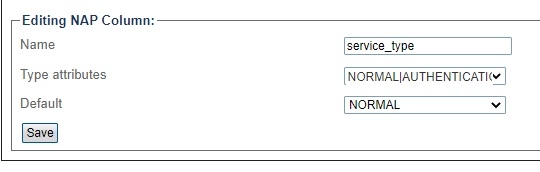
Add service_type in NAPs Column

NAPs Columns->Create New NAPs Column
    Name->service_type
    Type attributes -> NORMAL|AUTHENTICATION|VERIFICATION
    Default ->NORMAL
  • Set the value to "AUTHENTICATION" for CLEARIP NAPs

Scenario 1:One ClearIP NAP

Follow the procedures in this scenario of you will only have one ClearIP NAP and do not need to differentiate between inbound and outbound calls.

Create Transport Server for ClearIP NAP

 SIP -> Create New Transport Server
    Name->SIP_TS_CLEARIP
    Port Type->TCP
    Port->5060
    IP Interface-> Select the IP interface which can reach to ClearIP on the public network

Create ClearIP NAP

NAPs->Create New NAP
    Name->NAP_CLEARIP
    SIP Transport Servers->SIP_TS_CLEARIP
    Proxy address->sip.clearip.com (Or appropriate Domain provided by ClearIP)
    Port range->[Select port range of IP interface above)

Set service_type to "AUTHENTICATION" for NAP_CLEARIP

NAP Columns -> select NAP_CLEARIP
service_type: AUTHENTICATION

Add Route to NAP_CLEARIP

Routes -> Create New Route
Name: To_ClearIP
NAP: (Any)  (or you can choose specific NAPs - you may need to create multiple routes in this case)
Remapped NAP: NAP_CLEARIP
Priority: 10

Scenario 2: More than one ClearIP NAP

Follow the procedures in this scenario if you have more than one ClearIP NAP and must differentiate between inbound and outbound calls.

Create 2 TCP transport servers: one for inbound and one for outbound

 SIP -> Create New Transport Server
    Name->SIP_TS_CLEARIP_IN
    Port Type->TCP
    Port->5060
    IP Interface-> Select the IP interface which can reach to ClearIP on the public network
 
 SIP -> Create New Transport Server
    Name->SIP_TS_CLEARIP_OUT
    Port Type->TCP
    Port->5060
    IP Interface-> Select the IP interface which can reach to ClearIP on the public network

Create Inbound ClearIP NAP and Outbound ClearIP NAP

NAPs->Create New NAP
    Name->NAP_CLEARIP_IN
    SIP Transport Servers->SIP_TS_CLEARIP_IN
    Proxy address->sip.clearip.com (Or appropriate Domain provided by ClearIP)
    Port range->[Select port range of IP interface above)
NAPs->Create New NAP
    Name->NAP_CLEARIP_OUT
    SIP Transport Servers->SIP_TS_CLEARIP_OUT
    Proxy address->sip.clearip.com (Or appropriate Domain provided by ClearIP)
    Port range->[Select port range of IP interface above)

Set service_type to "AUTHENTICATION" for NAP_CLEARIP_IN and NAP_CLEARIP_OUT

NAP Columns -> select NAP_CLEARIP_IN
service_type: AUTHENTICATION
NAP Columns -> select NAP_CLEARIP_OUT
service_type: AUTHENTICATION

Add Routes to NAP_CLEARIP_IN and NAP_CLEARIP_OUT

Routes -> Create New Route
Name: To_ClearIP_IN
NAP: specific NAPs which carry the inbound traffic
Remapped NAP: NAP_CLEARIP_IN
Priority: 10 
Routes -> Create New Route
Name: To_ClearIP_OUT
NAP: specific NAPs which carry the outbound traffic
Remapped NAP: NAP_CLEARIP_OUT
Priority: 10

Final Common Procedures

Follow these procedures to wrap up the ProSBC configuration work. They apply to both previously described scenarios.

Configure other Routes

You need to configure other routes after the ClearIP routes if you want ProSBC to perform route advances upon receiving 503 or 302.

 Check the below link for the detail instruction to create static routes:
 
 It could also combine with other Routeset routing:
 

Configure Route Retry Action for the related Reason Cause Code

Route retry action of 3xx, 404 and 603 must be configured to allow ProSBC to perform failover, fraud control and SHAKEN AS/VS request.

Profiles->Edit Reason Cause Mapping
    404 Not found->Route retry action->Continue call
    503 Service unavailable->Route retry action->Continue call
    603 Decline->Route retry action->Stop call
    302 Moved Temporarily-> Route retry action: Process call routing

Note:

  • The default route retry action of 404 is Stop call.

  • The default route retry action of 603 is Continue call.

Click here to download ClearIP_Query.rb (the filter script)
Refer to Main_ClearIP.rb here to know what it should look like in your existing "main" script
this page