
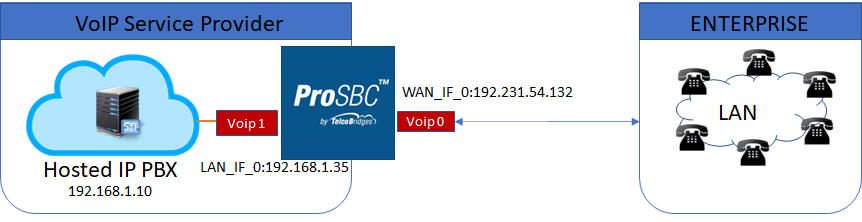
Configuring a Hosted PBX
Introduction
ProSBC Hosted PBX Example Configuration provides you with a step-by-step Hosted PBX Configuration of ProSBC systems, using the Web Portal configuration tool. Complete general installation configuration steps, before you begin configuring your specific scenario.
Hosted PBX Example
Prerequisites
ProSBC devices must be installed as described in their respective installation guides.
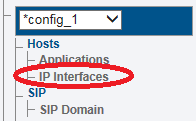
IP Network Configuration
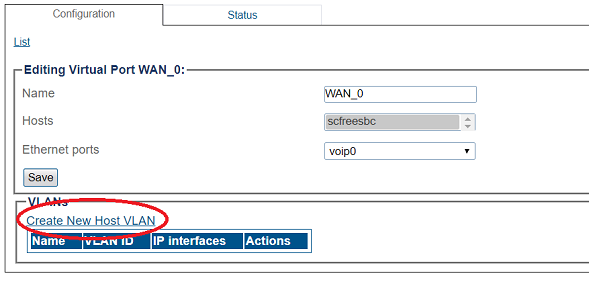
Virtual Port Configuration for Wide Area Network
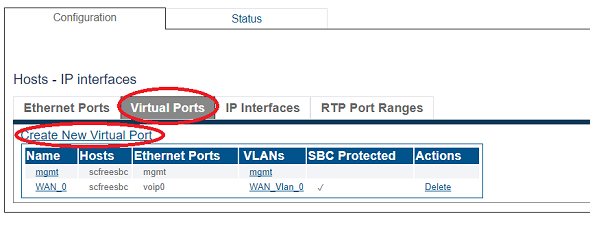
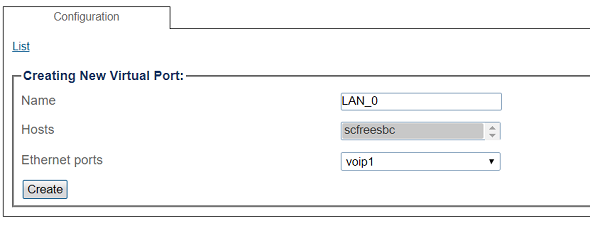
1. Select IP Interfaces from the navigation panel
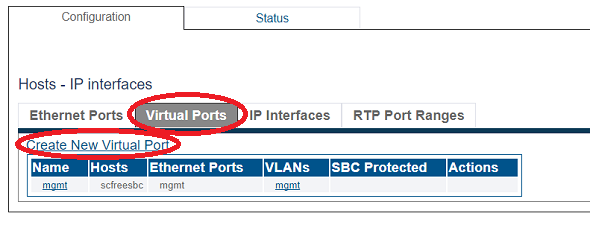
2. Click the Virtual Ports tab.
Click Create New Virtual Port
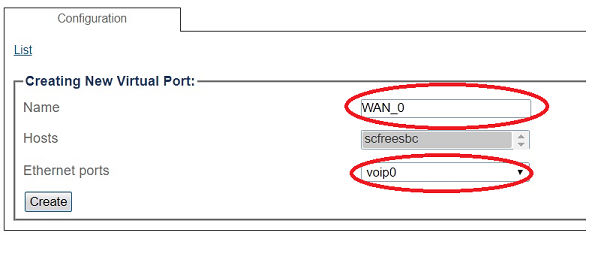
3. Configure the virtual port.
Enter a name for the virtual port
Select the host(s) to which the virtual port is assigned
Select a physical port to which the virtual port is assigned
Click Create
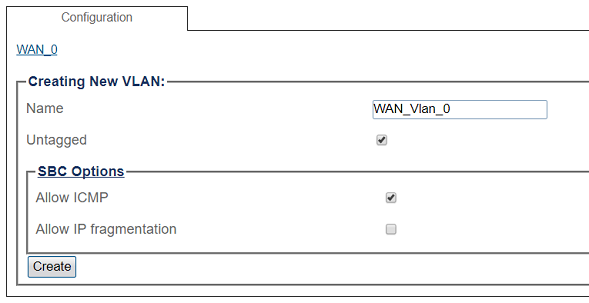
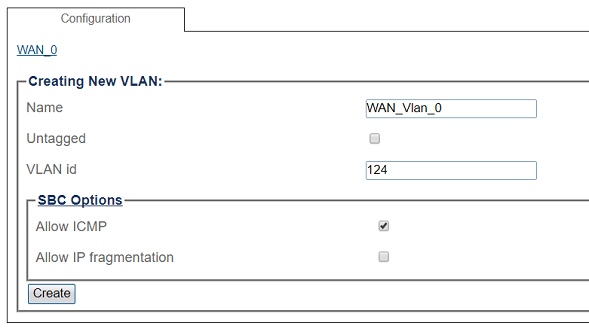
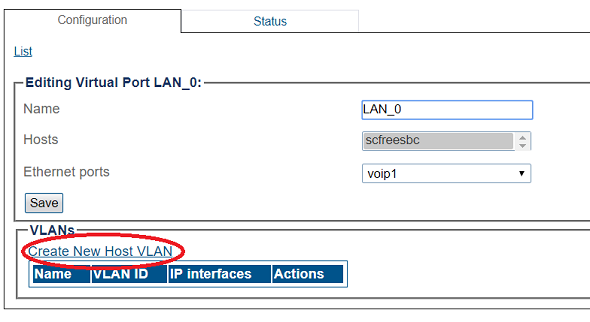
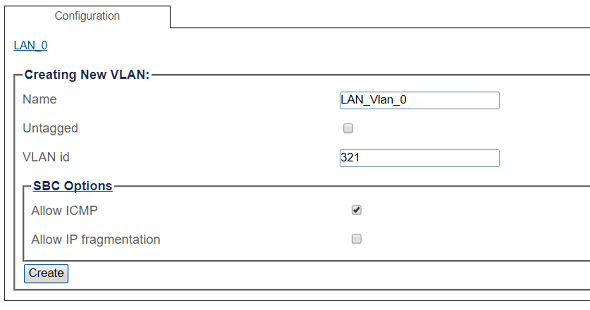
4. Create a VLAN that uses this virtual port
Click Create new Host VLAN
5. Configure the new VLAN
Enter a name for the VLAN
If the port is to be used untagged, make sure Untagged is checked.
If the port is to be used with a 802.1Q tag, uncheck Untagged and enter a VLAN ID.
Click Create
OR
Virtual Port Configuration for Local Area Network
1. Select IP Interfaces from the navigation panel
2. 2. Click the Virtual Ports tab.
Click Create New Virtual Port
3. Configure the virtual port.
Enter a name for the virtual port
Select the host(s) to which the virtual port is assigned
Select a physical port to which the virtual port is assigned
Click Create
4. Create a VLAN that uses this virtual port
Click Create new Host VLAN
5. Configure the new VLAN
Enter a name for the VLAN
If the port is to be used untagged, make sure Untagged is checked.
If the port is to be used with a 802.1Q tag, uncheck Untagged and enter a VLAN ID.
Click Create

OR
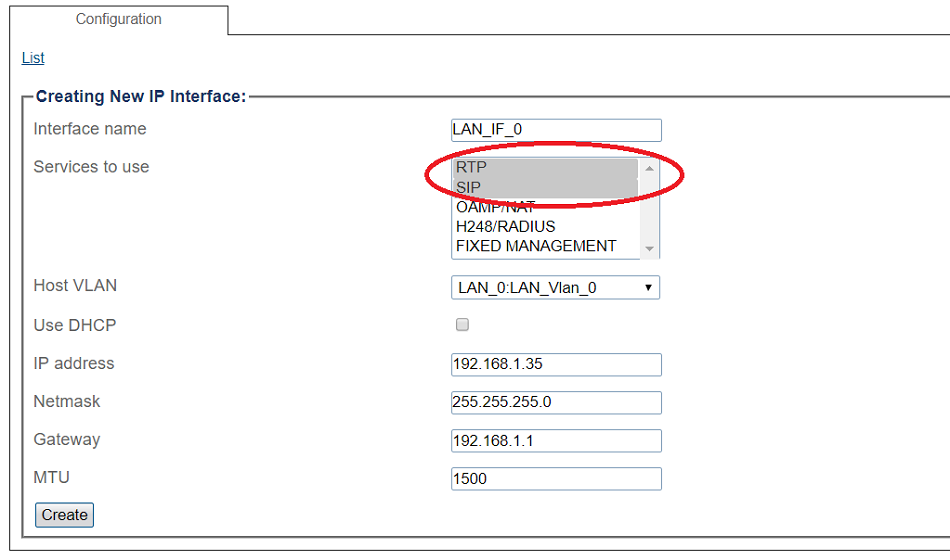
Configuring IP Interface for Wide Area Network
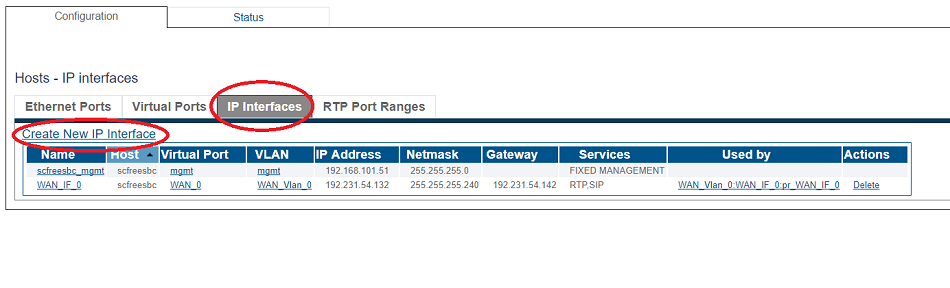
1. Select IP Interfaces from the navigation panel:

2. Click the IP Interfaces tab.
Click Create New IP Interface
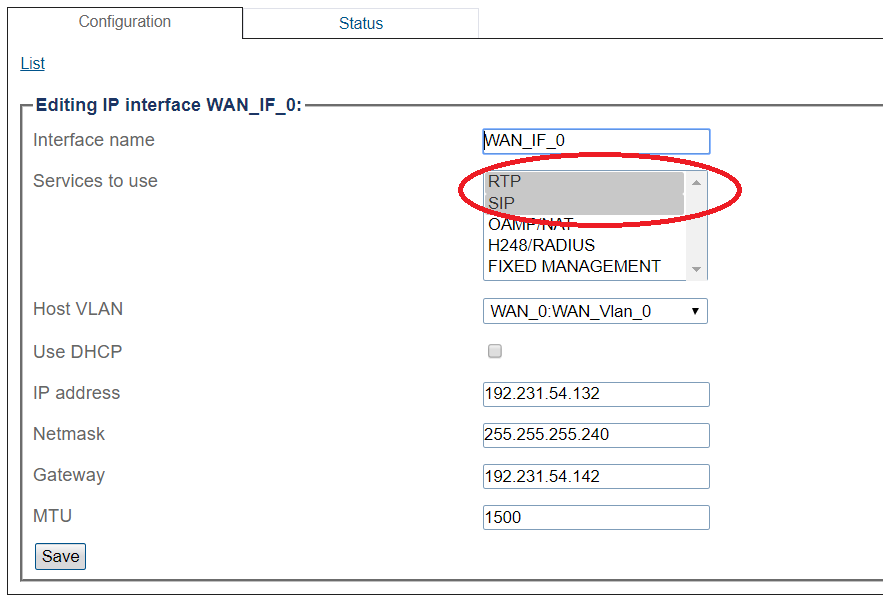
3. Configure the IP interface:
Enter a name for the interface
Select 1 or more services to use for the IP interface (RTP and SIP).
Select the Host VLAN from which IP packets will exit.
Indicate whether or not to use DHCP to automatically get an IP address for this port. (selecting this option removes the need to enter and IP address, Netmask, and Gateway)
Enter an IP address
Enter a Netmask
Enter a gateway address
Click Save
Configuring IP Interface for Local Area Network
1. Select IP Interfaces from the navigation panel:
2. Click the IP Interfaces tab.
Click Create New IP Interface
3. Configure the IP interface:
Enter a name for the interface
Select 1 or more services to use for the IP interface (RTP and SIP).
Select the Host VLAN from which IP packets will exit.
Indicate whether or not to use DHCP to automatically get an IP address for this port. (selecting this option removes the need to enter and IP address, Netmask, and Gateway)
Enter an IP address
Enter a Netmask
Enter a gateway address
Click Save

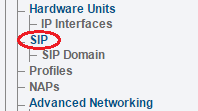
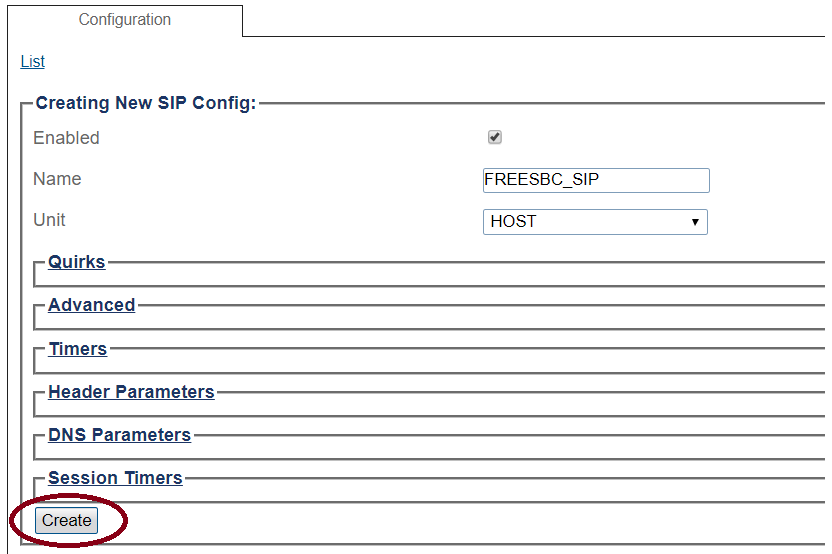
SIP Stack Configuration
You must configure SIP signaling for your system. The first step in doing so is to create a SIP stack:
1- Click SIP in the navigation panel
2- Click Create New Sip
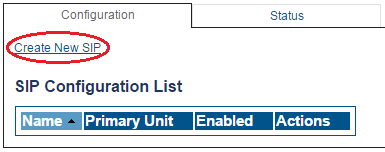
3- Create the new SIP stack:
Verify that the box labeled Enabled is checked
Enter a name for the stack
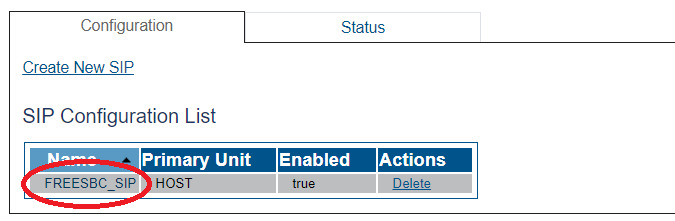
Click Create
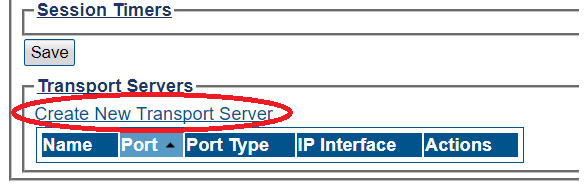
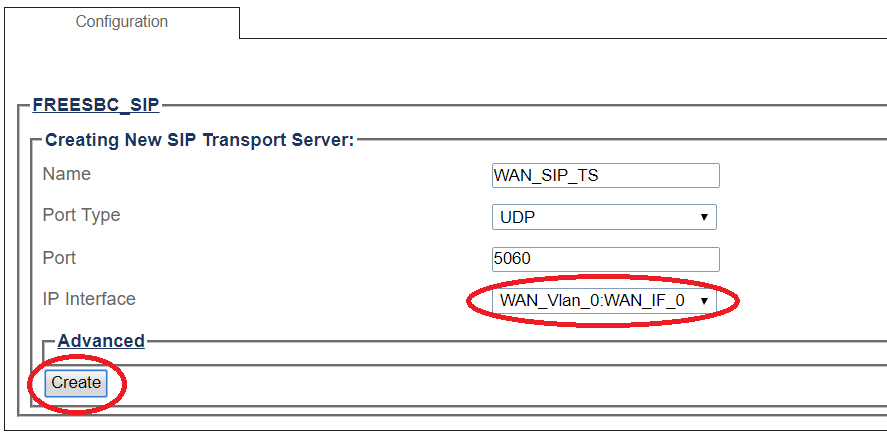
SIP Transport Server Configuration for Wide Area Network
1- Click SIP in the navigation panel
2- Select a SIP stack for which you wish to create a transport server
3- Click Create New Transport Server
4- Create the new SIP transport server:
Enter a name for the server
Select an appropriate port type
Select an appropriate host IP interface
Click Create
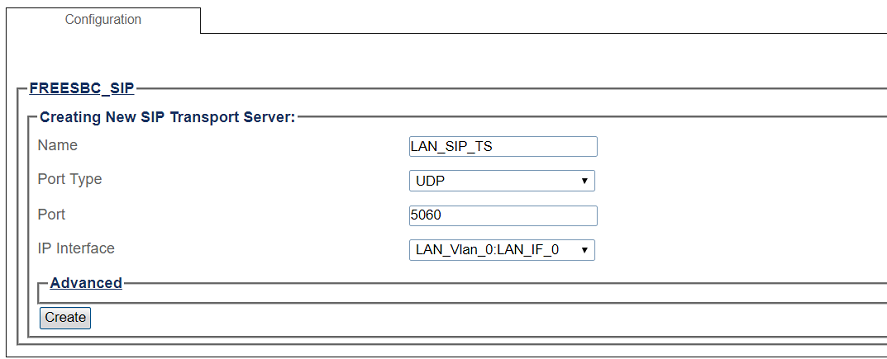
SIP Transport Server Configuration for Local Area Network
1- Click SIP in the navigation panel
2- Select a SIP stack for which you wish to create a transport server
3- Click Create New Transport Server
4- Create the new SIP transport server:
Enter a name for the server
Select an appropriate port type
Select an appropriate host IP interface
Click Create
SIP NAP
A Network Access Point or NAP represents the entry point to another network or destination peer (e.g. SIP proxy, SIP trunk, etc)
SIP NAP Configuration for Wide Area Network
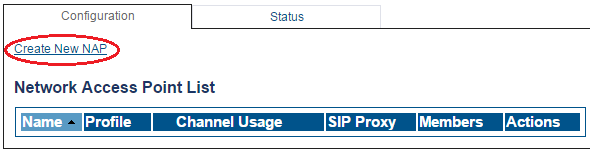
To create a new NAP:
1- Click NAPs in the navigation panel
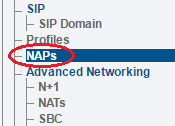
2- Click Create New NAP
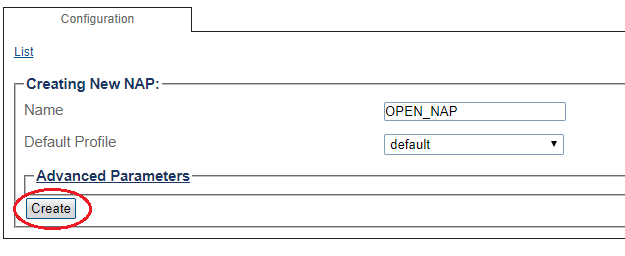
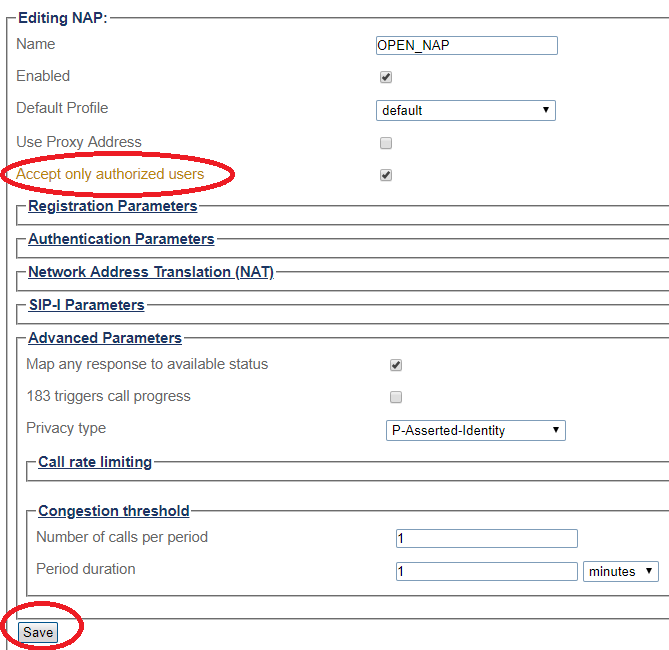
3- Create the new NAP:
Enter a name for the NAP
Click Create
4- Verify that the NAP was successfully created message appears
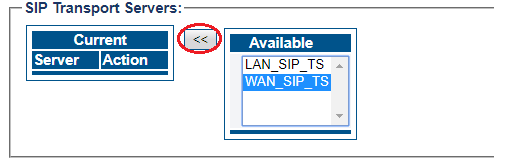
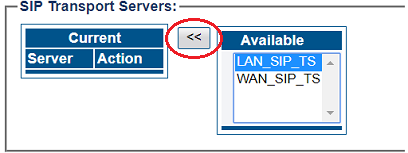
5- Associate a SIP transport server with the new NAP:
Select a SIP Transport Server from the Available list
Click "<<" to associate the WAN_SIP_TS with the NAP
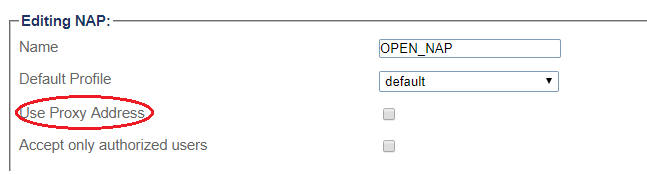
6- Disable proxy address:
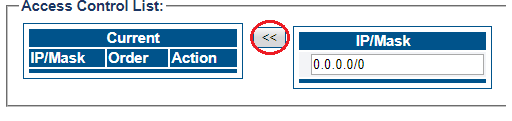
7- Enter full access in the access control list
Enter an IP/MASK (use 0.0.0.0/0 to accept any addresses)
Click "<<" to add in the list of Access Control
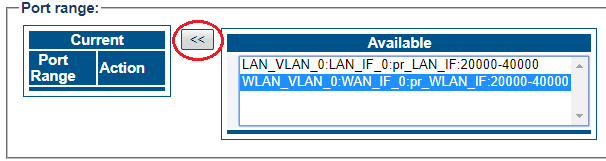
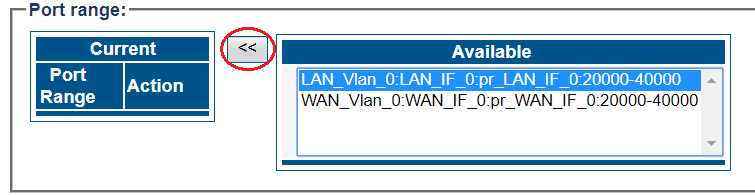
8- Associate a Port range with the new NAP:
Select a port range from the Available list
Click "<<" to associate WAN_Vlan:0 Port range with the NAP
9 - Configure settings for the following parameter groups as required:
Check Accept only authorized users option. With this option unchecked, ProSBC will forward any INVITEs sent to the "Open NAP" to the PBX without first authenticating the user.
Registration Parameters
Authentication Parameters
Network Address Translation
SIP-I Parameters
Advanced Parameters
Click Save
SIP NAP Configuration for Local Area Network
To create a new NAP:
1- Click NAPs in the navigation panel
2- Click Create New NAP
3- Create the new NAP:
Enter a name for the NAP
Click Create

4- Verify that the NAP was successfully created message appears
5- Associate a SIP transport server with the new NAP:
Select a SIP Transport Server from the Available list
Click "<<" to associate the LAN_SIP_TS with the NAP
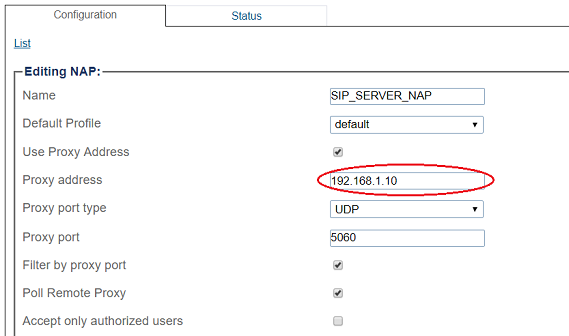
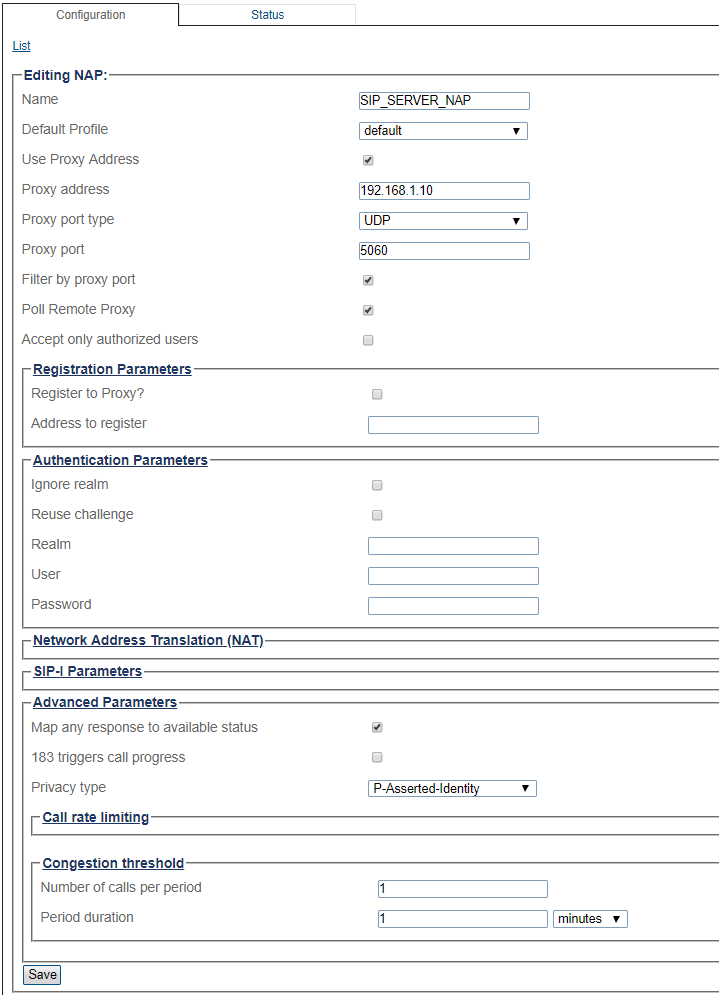
6- Enter SIP Server proxy address:
7- Associate a Port range with the new NAP:
Select a port range from the Available list
Click "<<" to associate LAN_Vlan:0 Port range with the NAP
9- Configure settings for the following parameter groups as required:
Registration Parameters
Authentication Parameters
Network Address Translation
SIP-I Parameters
Advanced Parameters
Click Save
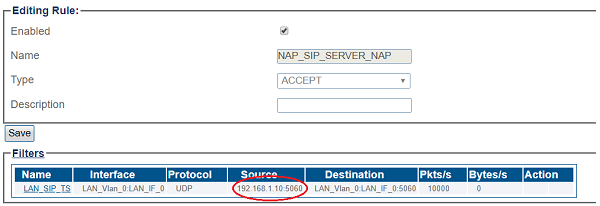
Access Control List
ProSBC will automatically create Access Control List for each NAP you created.

If you double-click one of the created ACL, you will see ProSBC only accept the calls if the source IP matches. In this sample; the calls from 192.168.1.10 will be accepted only.
SIP DOMAIN
A SIP domain represents a grouping of devices (or users) that can communicate with one another. You must configure SIP Registration Domain for your system. The first step in doing so is to create a SIP Domain:
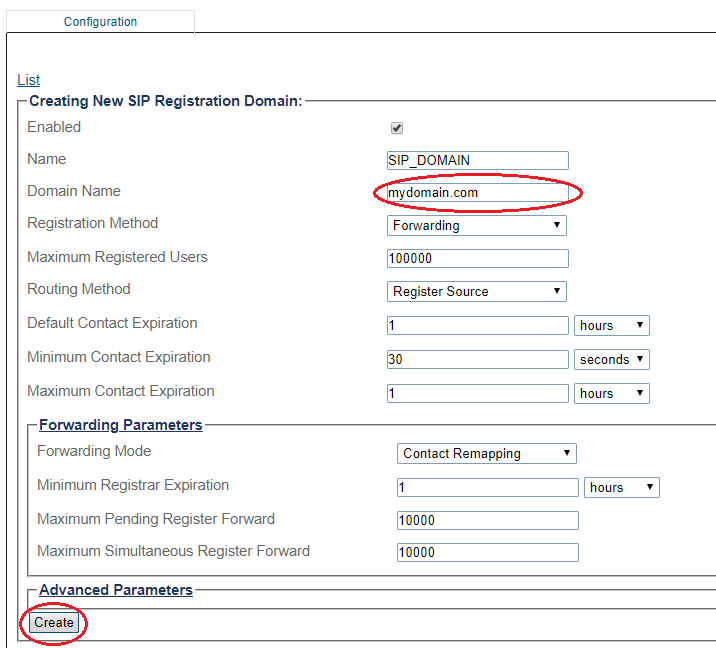
Create New SIP Registration Domain
1- Click SIP Domain in the navigation panel
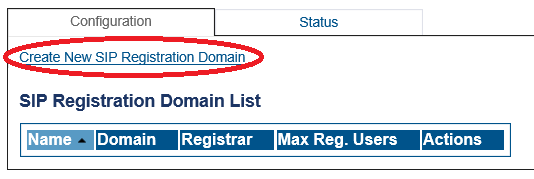
2- Click Create New Domain
3- Create the new Domain:
Enter a configuration Name for this domain.
Enter a Domain Name for the SIP Registration Domain (the domain can be an FQDN or an IP address)
Set the number Maximum Registered Users for this domain
Set the Expires value used by SBC when the remote device doesn't supply one ( Default Contact Expire)
Select Routing Method the system will use to route calls to registered users (if enabled in routing scripts).
Register source: Sends SIP Invite to the registering source IP address.
Contact: Sends SIP Invite to the 'contact' from the Register message.
Set the Default Contact Expiration, this value will be used when no Expires value is supplied by the user agent.
Set the Minimum Contact Expiration, this is the minimum Expires value that can be supplied by a user agent. Lower values will be rejected with a 423 'Interval too brief' response.
Set the Maximum Contact Expiration, this is the maximum Expires value that can be supplied by a user agent. The higher value is replaced by this parameter.
Forwarding Parameters:
Select the Registration Forwarding Mode to the registrar:
Contact Remapping: Changes the user and the IP address.
Contact Passthrough: Doesn't change anything. Enables devices to be contacted directly without going through the SBC.
Set Minimum Registrar Expiration, this is the minimum Expires value sent by the SBC to the registrar. If a user agent's 'Expires' value is greater than this parameter, the SBC will do rate adaptation between the user agent and the Registrar.
Set Maximum Pending Register Forward, the maximum number of simultaneous pending register requests allowed for this domain. New REGISTER request is being refused passed this threshold.
Set Maximum Simultaneous Register Forward, the maximum number of simultaneous active register requests allowed for this domain. New REGISTER request is being refused passed this threshold.
Click Create
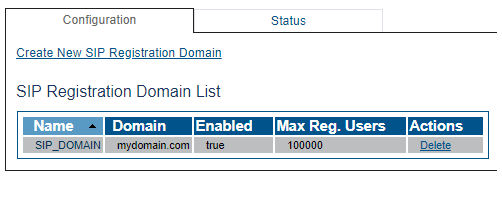
4- Verify that the Sip registration domain was successfully created message appears
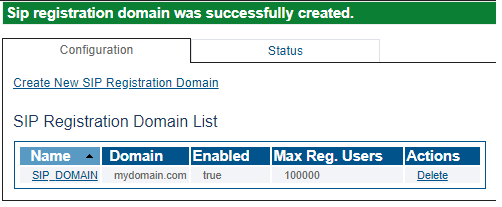
5- If your registrar has multiple domains, you need to create all the domains one by one.
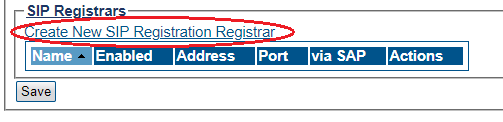
Create New SIP Registration Registrar
A SIP registrar represents a SIP endpoint that provides a location service. You must configure SIP Registrar for your system. The first step in doing so is to select your SIP Domain:
1- Click on your domain in the SIP Domain List
2- Click Create New SIP Registration Registrar
3- Create the new SIP Registration Registrar
Enter a Name for the SIP Registration Registrar
Select pre defined SIP Proxy NAP from drop-down menu
Click Create

4- Verify that the Sip registration registrar was successfully created message appears
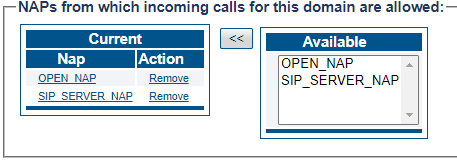
Associate a SIP Domain with the new NAP
Associate a SIP Domain with the new NAP. If you have more then 1 registrar domain using the same registrar you can associate all of them with the NAP:
Select a sip domain from the Available list
Click "<<" to associate the SIP Domain with the NAP
Call Route
You must set up call routing for your system. Call routing refers to the ability to route calls based on criteria such as origin, destination, time of day, service provider rates, and more.
Route Configuration for Remote Phones to SIP Server
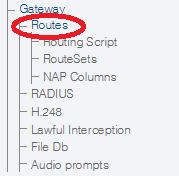
1- Click Routes in the navigation panel
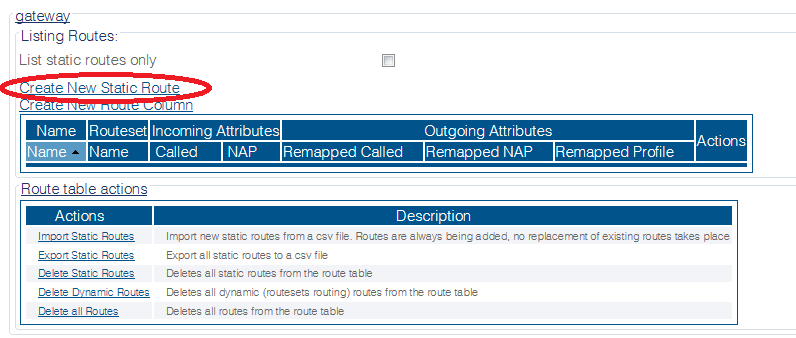
2- Click Create New Static Route
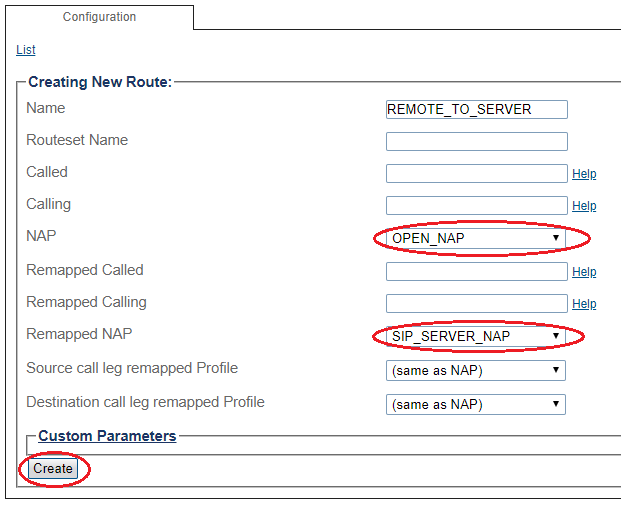
3- Create the new route:
Enter a RoutesetName for the route
Select SIP_REMOTE, to match calls from Trunk NAP
Select SIP_SERVER_NAP
Click Create
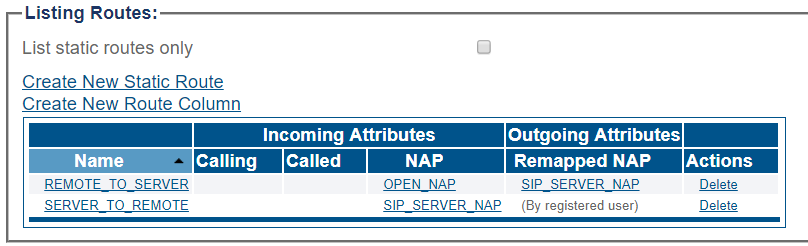
4- Verify that the " Route was successfully created" message appears and that the new route is listed in the Routeset list
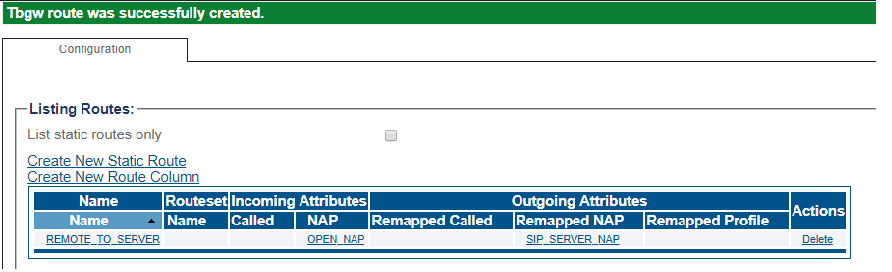
Route Configuration for SIP Server to Remote Phones
1- Click Routes in the navigation panel
2- Click Create New Static Route
3- Create the new route:
Enter a RoutesetName for the route
Select SIP_SERVER_NAP, to match calls from Trunk NAP
Select (By registered user)
Click Create
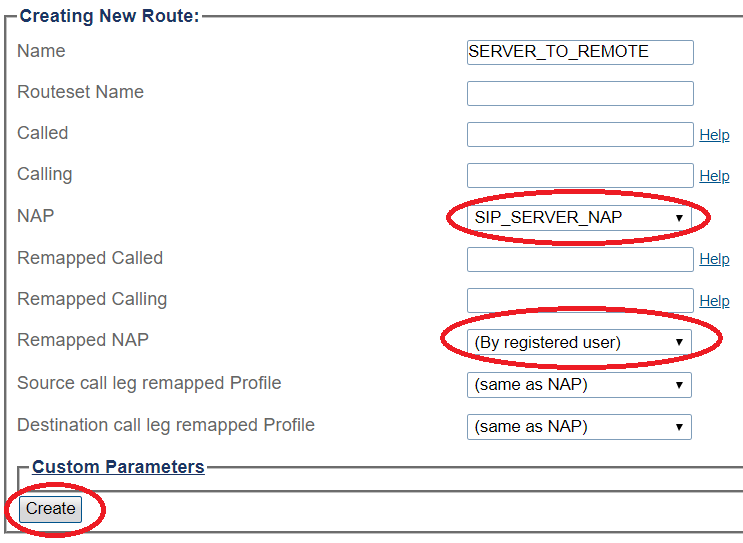
4- Verify that the " Route was successfully created" message appears and that the new route is listed in the Routeset list
Activating the Configuration
Changes made to the configuration of the ProSBC units are stored in the OAM&P Configuration and Logging database. In order for changes to be used by the system, they must first be activated. This is done at the system level and accessed from the Navigation panel.
Check the following link for activating the configuration;
Toolpack:Activating_the_Configuration_D
Adding NAT for RTP problems
If you are having RTP problems after the configuration you need to check the NAT setting. Please check the link for NAT
SBC Use Cases
SBC Tutorial Guide V3.0
Last updated
Was this helpful?